Wednesday, December 14, 2011

Friendship's Garden Challenge Blog: Anything Goes Christmas or New Year Theme Challenge!

(click on image to enlarge)

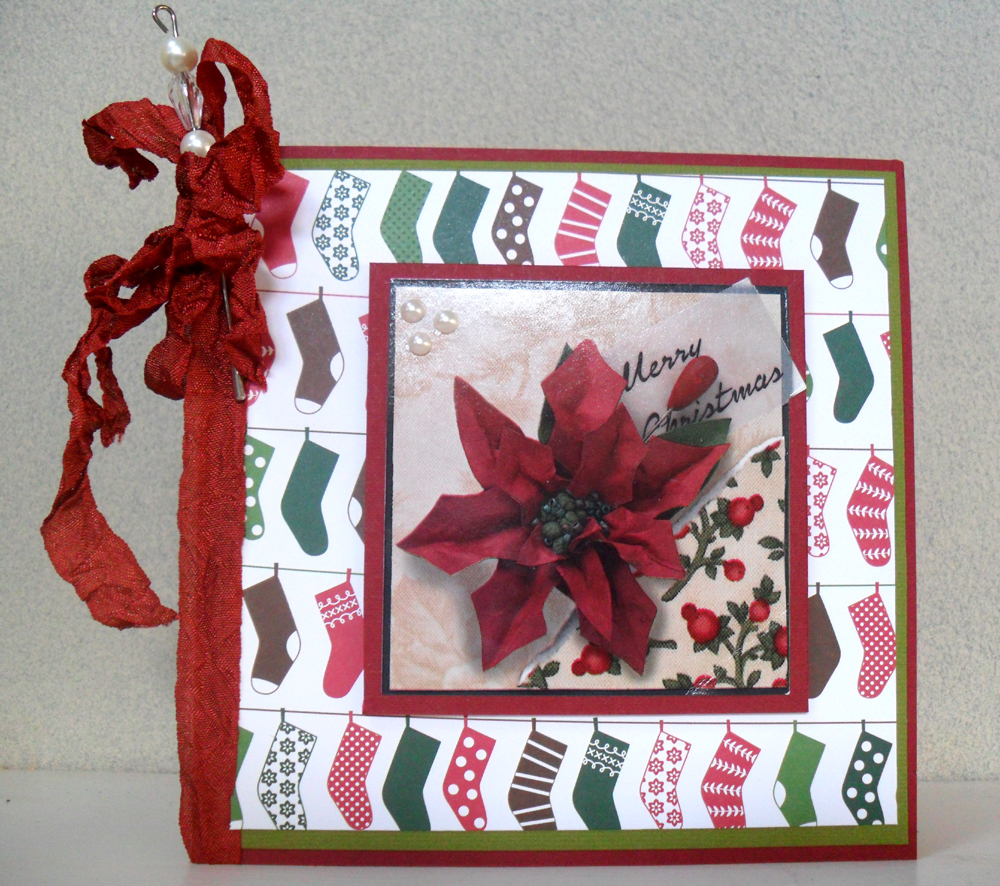
This week's challenge over at Friendship's Garden Challenge Blog is:  Anything Goes with a Christmas, New Year, or Winter theme!  For this challenge, I made a 6 x 6 card using patterned paper from Bo Bunny's Blitzen line.  I love the vintage-y feel of this paper.  I decided to try something different and incorporate blue and green in this card, using the patterned paper as inspiration.  Often, when I buy patterned paper, I try to find the exact match in cardstock while I'm in the store.  It's just so much easier to do it that way, even if I don't plan to use the patterned paper on a project right away.  I just store the cardstock with the patterned paper for later use.

I knew that I wanted a large vintage Santa image to use on this card, one that was more of a bust or headshot.  I found the perfect one HERE.  There were a variety of Santa images to choose from.  I added ribbon, twine, and a charm I got from Etsy.  The final touches were the sentiments.  The North Pole ticket sentiment came from an awesome site I recently discovered.  She has a lot of awesome free printable sets, including ticket sets!  Check out the site HERE.  I used the North Pole ticket from one of the Christmas ticket sets.  I also took one that said "Merry Christmas", but cut out just the words instead of using the entire ticket image.

As you can see, you can put a card together using printables for the image and sentiments -- and without paying for any of them!  Hope you enjoyed your visit today.  Don't forget to check out Challenge 6 over at Friendship's Garden Challenge Blog.  Have a great day!

Friday, December 9, 2011

Christmas Cards & Cookies Blog Hop: Weekend Two

(click on image to enlarge)

Welcome to Round Two of the Christmas Cards & Cookies Blog Hop!  There was so much response to the Christmas Cards & Cookies Blog Hop that it had to be split between two weekends.  Round One was held last weekend.  Round Two is this weekend, beginning on Saturday, Dec. 10th, through Sunday, Dec. 11th.  We have a talented group of women who love papercrafting and baking.  Each of them is sharing a recipe for a yummy Christmas treat along with a Christmas card or tag.  Hopefully, you’ll pick up some great ideas for your own Christmas gift giving this season.  So, grab a cup of coffee, sit back, and enjoy!

In Round One of this blog hop held last weekend, I featured a cookie recipe.  It's a long-time favorite called Rolo Cookies.  If you'd like to see that post, CLICK HERE.


For this weekend's project, I am featuring The World's Easiest Fudge recipe.  It really is super easy!  Now, I know a lot of people use the recipe on the back of the marshmallow fluff jar, but I don't always have a jar of that stuff on hand.  This recipe calls for only two ingredients!  Here is the recipe:

World's Easiest Fudge

Ingredients:

one bag of chocolate chips
one can of prepared frosting

Pour both into a microwavable bowl.  Heat in microwave in 30-second intervals.  Heat and stir until melted.  Pour into wax or foil-lined pan and cool.  

*Optional:  Mix in nuts, raisins, crumbled cookies, etc ... to kick things up!

(yummy fudge)


(my daughter showing off some of the fudge she made all by herself)

This fudge is really rich.  You don't need to eat a lot of it to satisfy a sweet tooth!

Now, for my card shown at the very top of this post:  I made a 4 x 4 note card to give with a package or tin of fudge.  I like doing these little notecards because you can keep them pretty simple.  The word "Christmas" on the front is actually a sticker that I matted.  I added some ribbon, twine, and a dimensional sticker.  The green polka dot paper is actually much brighter IRL.  I wish it photographed better!  *sigh*  All in all, making this card was pretty easy and quick.  One tip I'd like to pass on is that matting really helps to add pizzazz to a card!

Well, I hope you try out -- and enjoy -- this recipe!  If you have any questions, please feel free to leave them in a comment along with an email address so I can contact you.

Thanks so much for stopping by! Please be sure to visit Theresa's blog next to see what she has to share with you!  

Below is the complete lineup should you get lost. 

Wednesday, December 7, 2011

Christmas Faith Songs Blog Hop: "The First Noel"

(click on image to enlarge)


Hello, Bloggers!

Welcome to my blog! You should have just come from Kari's blog.  She is the host of the Christmas Faith Songs Blog Hop.  Today, we are worshipping the King and the reason for the season! We are doing that by highlighting our favorite Christmas songs along with a project we've created.

Our "gift" to you today is really just the gift of fellowship and testimony by way of today's blog hop.  BUT, there are some other goodies to be had!  To be eligible, you must comment on each of the blogs in this hop.  It would be nice if you would become a follower of each blog as well, but it is NOT a requirement to be eligible for the prize.  Kari will select a winner using random.org.

*Be sure to leave your email address in your comments so you can be contacted should you win.  If there is no way to contact you, another name will be drawn for the prize!

We would like to thank Jillian Vance for sponsoring the blog hop candy. Check out this beautiful stamp set that the lucky winner will get! I'm thinking I'm going to have to order a set for myself!  LOL! The winner will also get a set of pins.


  Please be sure to check out her site !  

Now, on to my project:

I selected the song "The First Noel".  Here is the first verse:


The first Noel the angel did say 
Was to certain poor shepards in fields as they lay: 
In fields where they lay a keeping their sheep 
On a cold winter's night that was so deep. 
Noel Noel Noel Noel 
Born is the King of Israel. 

This song speaks to me because it tells the story of the birth of our one and only savior, Jesus Christ.   What an amazing thing it would have been to have been present the night the King of Israel was born!  Now, we can only imagine what it would have been like, but for those of us that are parents, we can bear witness to the next best thing :  the birth of our own children.  

As a mother to two beautiful daughters, I know firsthand what a beautiful thing it is to bring a child into this world.  I have a 15-year-old daughter named Mikayla and, in September of 2010, I gave birth to another daughter -- a beautiful girl that we named Madison.  Sometimes, I find myself wondering who these girls will be one day.  What does God have in store for them?  What is His plan for them?  How can they serve the Lord?  All I can do is pray that God grants me the wisdom to raise them and guide them in the direction He has planned for them.  

For today's project, I did a digital layout focusing on my baby, Madison.  I used a digital kit by one of my favorite designers, Kristin Aagard.  Now, I've only just recently found out about her, but I am completely in love with her designs!
The layout features pictures of my fiance' and I with Madison the day we took her home from the hospital.  You can see our precious baby bundled up and wearing her pink cap.  *SMILE*  The journaling reads :

On September 3, 2010, the Lord 
blessed us with a beautiful
daughter.  Our lives changed
drastically from that day on, but
we wouldn't change anything for 
the world.  She is truly a gift
from God, and we thank Him
every day for our sweet baby
'Anela.

Now, if you're wondering about the last word in my journaling ('Anela), it is a Hawaiian name pronounced ah-ne-luh and means ANGEL.  It is one of Madison's middle names.  Yes, ONE of them.  LOL  She has three which is kind of a tradition in our family.

Thanks for stopping by.  I hope you enjoyed your visit!  I read every comment and appreciate every single one!  If you have any questions, please be sure to leave an email address so I can contact you.

Don't forget that you need to comment on all the blogs in the hop in order to be eligible to win.  Please hop on over to Carolyn's blog next!  Below is the complete lineup should you get lost along the way.  Thanks again and have a blessed day.  Merry Christmas! =)


1. Kari - http://purplefuntastickcreations.blogspot.com/ "Mary Did You Know"
2. Dena - http://missdjones.blogspot.com/  "The First Noel"
3. Carolyn - http://messmuddleandfun.blogspot.com/ and my sons is "Hark the Herals Angels Sing"
4. Lynne - http://slasewcraftiness.blogspot.com/ and my song is "Ihr Kinderlein Kommet"
5. Zenita - http://www.scrappinwithz.blogspot.com  and my song is "Silent Night"
6. Susan - http://susanascorner.blogspot.com/ "Joy to the World"
7. Jen Y - http://www.expressivelyme.blogspot.com  and my song choice is "O Holy Night" :)
8. Tina- http://craftyandgreen.blogspot.com  My song is Labor of Love


Friday, December 2, 2011

Christmas Cards & Cookies Blog Hop: Weekend One


Welcome to Round One of the Christmas Cards & Cookies Blog Hop!  There was so much response to the Christmas Cards & Cookies Blog Hop that it had to be split between two weekends. This is Round One and begins Saturday, Dec. 3rd, continuing through Sunday, Dec. 4th. Round Two will be held next weekend. We have a talented group of women who love papercrafting and baking. Each of them is sharing a recipe for a yummy Christmas treat along with a Christmas card or tag. Hopefully, you’ll pick up some great ideas for your own Christmas gift giving this season. So, grab a cup of coffee, sit back, and enjoy!

I made a Christmas card using some super cute Doodlebug paper!  The snowman is from a diecut swap I was in last year.  I made this diecut with a Sizzix die.  It's one of my faves!  I filled in the hearts with red stickles and used a white puffy paint pen for the white wavy accents on the arms and legs.  The scarf was some fancy ribbon I had in my stash.  The scarf and ribbon are actually red IRL (in real life).  Unfortunately, the colors don't show up so well here.  Last, I added faux stitching with a pen.  I made a few of these last year and kept them to use this year.  So glad that I did!

Now, for my recipe:


ROLO COOKIES

Ingredients: 

1 box devil's food cake mix
2 eggs
1/3 c oil
Rolo candies

Mix the first 3 ingredients.  Take a small portion, just enough to wrap around a Rolo candy.  Shape into a ball.  Bake at 350 degrees on greased cookie sheet for approximately 7-9 minutes.  Dust with powdered sugar (optional).

That's it!  Easy peasy!  These are always a crowd pleaser.  The caramel gets nice and gooey when the cookies are fresh out of the oven.  YUM!  If you have any questions, feel free to post a comment with your email address, and I'll get back to you.  Don't forget to return next week for Round Two of the Christmas Cards and Cookies Blog Hop.  

Thanks for stopping by!  Please be sure to visit Robin's blog next to see what she has to share with you!

Below is the complete blog hop lineup:  

Wednesday, November 30, 2011

Friendship's Garden Challenge Blog: Pinterest Inspiration


Hello, bloggers!  How do you like the new look here?  LOL!  I finally changed the template and decided to go with a Christmas theme.  I have to say that I really like it!  It's so cute and festive!  Well, I hope you all had a great Thanksgiving holiday.  As usual, I ate way too much.  OINK!  I did all the baking and cooking, so I was pretty exhausted after.  No venturing out to the mall on Black Friday for me, BUT my boyfriend did buy me an early Christmas present online.  I'm getting a Silhouette Cameo!!! WOO-HOO!!!!  It won't ship until early or mid-December, so that means it will be a few weeks before I can play with my new toy.  BOO HOO!  I can't wait! *pout*

Well, enough pouting and on to the latest challenge at Friendship's Garden Challenge Blog..  This time, it's a color inspiration challenge from a Pinterest post.  Here are the colors :


I made a quick card using a diecut I had in my stash as the focal point.  I added some seam binding and a vintage stick pin from SU!  I finished off the card with a few flat pearls.

I'm going to be posting more projects in the next few weeks, so please be sure to stop by again.  I'm sponsoring a blog hop this weekend called "Christmas Cards and Cookies".  There will be 15+ talented ladies sharing Christmas cards and tags along with recipes for yummy Christmas goodies.  So, if you're looking for some ideas for goodies you can bake for your friends and family, be sure to stop by.

Last, I want to share that the turkey card I posted a few weeks ago was selected as one to be showcased over at Die Cuttin Divas.  I was so flattered that they chose my card!


Well, thanks for stopping by.  Don't forget to stop by and enter the latest challenge over at Friendship's Garden Challenge Blog.

Thursday, November 17, 2011

Twilight Blog Hop: Day One


Welcome to the Twilight Blog Hop. You should have just come from Jamie's blog. If you are just visiting me and want to start from the beginning of this hop, please hop on over to Carla's blog. We are celebrating all things Twilight and the opening of the Twilight Saga "Breaking Dawn part 1" in theaters. Make sure you check out all the Twilight related projects on both days. And what would a Blog Hop be without a little Blog Candy right? Our sponsor for this hop is Karber Digital Images and they have generously offered 2 of their awesome Digital Images to a random commenter. To be eligible to win you must comment on everyone’s blogs on both days. We want to say a huge thank you to Berenice Rendon and Karber Images. The complete list of participating blogs is at the bottom of this post.  


For day one's project, I've created a digi layout using My Memories Suite scrapbooking software.  I'm not affiliated with the company at all, so I am completely unbiased when I say, "I LOVE THIS SOFTWARE!!!"  If you love digi scrapbooking and "Twilight", you MUST get this awesome Twilight kit available from My Memories.  When I saw that they had it, I knew I had to use it for this blog hop!  

The layout features a photo taken at a Twilight expo held here a few years ago.  From the layout, it's pretty obvious that I'm on TEAM JACOB! WOO-HOO!!!  They had this life-sized cardboard image of him at one of the booths, and I just HAD to take a picture with it!  LOL!  Now, if you're wondering why he has a lei on, it's because we're in Hawaii.  I love how the color of the lei matches my top in the picture -- makes me feel like we sorta "match".  LOL!  Okay, I'm being silly, but a girl is allowed to get silly over a handsome character isn't she?  =)

Well, please be sure to come by tomorrow.  I'm hoping to finish up a mini album that I'm creating for my teenager.  Be sure to visit Joy's blog next !  Thanks for stopping by!

Carla~ http://racincrafts.blogspot.com/
Berenice - http://karbersweetescape.blogspot.com/
Amy - http://www.lovetocrop.com/
Nancy - http://blog.fancywithnancy.com/
Kristen-http://huneebcreations.blogspot.com/
Theresa -http://thescrapbookingqueen/-princesspenelope.blogspot.com/
Jessica - http://scrappyluvs.blogspot.com/
Jamie- http://myamusinglife.blogspot.com/ 
Dena - http://missdjones.blogspot.com/  <<< YOU ARE HERE
Joy - http://justjoycrafts.blogspot.com/  <<< GO HERE NEXT
Tanya - http://little-scrapper.blogspot.com/

Tuesday, November 15, 2011

Friendship's Garden Challenge Blog: Thanksgiving Recipe


Hello, Bloggers!  There is a new challenge posted over at Friendship's Garden Challenge Blog.  It's a recipe challenge with a Thanksgiving theme.  The recipe calls for:

3 trims
2 patterned papers
1 diecut

Being that I live in Hawaii where we don't have a true "fall" season, it is REALLY difficult to find autumn/fall themed paper!  I went to an LSS and got the very last sheet of this cute patterned paper.  The great thing is that it is two-sided, so I really only needed one sheet of paper to get two different patterns.  

For the diecut, I turned to my trusty Cricut E and the Create a Critter cartridge for this cute turkey.  I love using Googly eyes for a whimsical touch to diecuts.  I also dressed up the turkey's hat with some mandarin twine from The Twinery and some bling.  Orange tulle and and brown ribbon were the second and third trims used on my card.  


I knew that I wanted to do something fun with this card, so I used a computer-generated sentiment.  If the font looks somewhat familiar, it's because it's the one associated with a game that is all the rage (no pun intended) right now:  Angry Birds.  LOL!  I printed the sentiment on brown cardstock and then embossed with a Cuttlebug folder I recently bought.  I was so excited to be able to use it!  It's hard to see, but I did ink the sign with Tim Holtz Walnut Stain Distress Ink.  I also pop-dotted the top part of the sign.


Here is another view of the turkey to show how I pop-dotted the turkey.  I love dimension on my cards!

I really had fun with this card.  So far, it's my favorite DT project for FGCB.  Please be sure to check out the challenge and try your hand at our Thanksgiving recipe.

Challenges:


The Pink Elephant :  embossing
Die Cuttin Divas :  Turkey Time

Wednesday, November 9, 2011

Friendship's Garden Challenge Blog: 15-Minute Card Challenge


For this week's challenge, the DT was asked to create a card in 15 minutes or less.  To be fair, I thought it best that I include the time I spent designing my card -- not just assembling it.  After all, what takes the longest -- for me, at least -- is the time I spend figuring out what the heck I'm gonna do!  I really wish I was one of those people that could design something in ten minutes.  Unfortunately, I am not one of those people.  *SIGH*

As you can see, I kept things simple.  I used some cute strawberry paper by Doodlebug and then matted it with white cardstock which I then adhered to my base cardstock. I think matting alone makes a huge difference in how a card looks.  It really doesn't take much time either.

I then selected this cute sticker from a sticker set that goes with the paper.  When I'm in a hurry, I find that the easiest thing to do is to use paper and elements that come from the same set.

Now, rather than ending up with a card with just a sticker on it, I added a few more elements.  I took a strip of white cardstock and fancied it up by embossing it with a Cuttlebug folder.  I then tied some pretty pink ribbon over it and added pink bling to the corner of the card.  Those were all simple touches that help to dress up any card.

I decided not to add a sentiment for two reasons:  1)  I was almost out of time and 2)  I had no plans to send this card to anyone in particular yet, so I figured I'd add either a thank you, birthday, or hello sentiment when the situation arises.

Thanks so much for stopping by!  Please be sure to scroll down and see my other posts for today!  ALOHA!

Sweet Stamping Treats Sketch Challenge


(close-up of the Stickles)

Happy Wednesday!  I have a total of THREE posts today!  WOW!  This is a card I created for the Sweet Stamping Treats Sketch Challenge.  I used one of the November releases called Penguins on Ice.  It's my favorite of this month's release! :)  I colored the image with Copics and then added Stickles to get a sparkly effect.  It reminds me of those Christmas cards that look like they have snow on them.  I LOVE those!!! LOL!  I wanted to add a little more to my card, so I added a sticker sentiment at the bottom and a button with some red and white twine.  The paper is Echo Park's Jolly Holly Christmas. If you're interested in purchasing this digi stamp, please visit Sweet Stamping Treats and be sure to check out all of their entire collection!  Aloha!

Hello Kitty Blog Hop Winner!!!!


A big MAHALO (thank you) to all of you who stopped by the Hello Kitty Blog Hop this past weekend.  Oh, my!  There was a HUGE turnout!  How SWEET! =)  

I would like to announce the winner of the blog candy I'm giving away.  I'm sorry I'm unable to post the pic from random.org.  A few of my blogger friends shared with me that they use the html to post to their blogs when they use random.org.  However, I must be random.org challenged because I couldn't figure out how to get the html code for just the box.  Errgghh!  LOL

Well, without further ado, the winner of this adorable set of Hello Kitty cookie cutters is poster # 2, Shar!!!  I left you a message on your blog, Shar!  Please contact me as soon as possible so I can send this way too cute set of cutters to you to enjoy!  

Thank you again to all of your bloggers who visit my blog.  I really do appreciate all of the blog love you leave!  Aloha!

Sunday, November 6, 2011

Christmas is For Kids Banner Hop: DAY TWO!


*** If you are looking for the Hello Kitty Blog Hop, CLICK HERE.


I am so honored and excited to be a participant in Day Two of Cardmonkey's Christmas is for Kids Banner Blog Hop.  Ellen (AKA CardMonkey) is the Admissions Coordinator at Pediatric Specialty Care in Bucks County, PA.  The following is an exerpt from her blog :

The children (ages 0-21) we see are medically-fragile and technologically-dependent -- many are tethered to a ventilator that runs through a tracheostomy; most are wheelchair-bound, and cognitively impaired.  They are all delightful children who face life with optimism and hope for a better tomorrow.  


The banners created for this two-day hope will all be sent to Ellen to deliver to Pediatric Specialty Care.  They will be hung in the doorways for the children to enjoy.  Isn't that such a wonderful idea?  If you would like to start with Day One's banners, CLICK HERE.  If you want to start at the beginning of Day Two's (today's) hop, CLICK HERE.

Now, on to my banner ....


 (1st 3 panels
click on image to enlarge)

(next 3 panels,
click on image to enlarge)

(last 4 panels,
click on image to enlarge)

I created a banner consisting of ten panels, each measuring 4 x 6 inches.  For the base, I used some super cute paper from the Santa's Workshop line by none other than DOODLEBUG!!! If you've been following my blog, you know I am a huge Doodlebug fan !  LOL!  I cut each piece and then adhered to cardstock to make the panels sturdier.  

Since the banner has to be shipped and then possibly repacked for use next year by the hospital (I hope!), I figured it would be best to keep the banner as flat as possible, so I stayed away from dimension on this project.  

I decided to add a little extra by using a Martha Stewart border punch to create strips that I added to the top of each panel.  I then used the Cricut Storybook cartridge to cut out the letters spelling HO HO HO.  I accented each letter with white gel pen.  The first, last, and two in-between panels were embellished with some cardstock Santa images from Daisy D's that I had in my stash.  They worked so perfectly on this project!  I found the pretty green and red duotone ribbon in my stash also.  I love it when I find something in my stash that turns out to be a perfect for something I'm working on !  =)

I'm so happy to have been a part of this wonderful blog hop!  Thanks so much for stopping by.  Please visit all the blogs on this hop to see all of the beautiful banners the ladies have created for these truly special children.  Don't forget that there is blog candy to be had.  See Cardmonkey's blog for all the details!  Your next stop is Sandie's blog.


  • Michelle - http://peanutbutterandjellydesigns.blogspot.com/


  • Tonya - http://creativeaddictiontopaper.blogspot.com/


  • Carol Carlson - http://cardstockscissorsandglue.blogspot.com/


  • Debbie Trevenen - http://debbiescrafttime.blogspot.com/


  • Linda Simpson - http://lindasimpsoncraftypieceofheaven.blogspot.com/


  • Rachelle - http://creationsbyrachelle.blogspot.com


  • Jamie - http://craftygirl21.blogspot.com/


  • Jess - http://www.KinderStampO.com


  • Sandra - http://www.365daysofcricut.blogspot.com


  • Cher- http://www.cherevansstudio.blogspot.com


  • Lori - http://www.scrappinmystressaway.blogspot.com


  • Dena - http://missdjones.blogspot.com  <<<--- YOU ARE HERE


  • Sandie - http://sandieshores.blogspot.com  <<<---- GO HERE NEXT


  • Alina - http://neverstopscrapping.blogspot.com


  • Lisa L - http://craftylam.blogspot.com


  • Janet S - http://ladyluvbug.blogspot.com


  • Beckie - http://justbcreativecrazy.blogspot.com
  • Friday, November 4, 2011

    Hello Kitty Weekend Blog Hop (Blog Candy!)


    Hello everyone and welcome to the Hello Kitty Blog Hop! We have lots of FABULOUS projects and prizes for you today, so make sure you make a stop on every blog! This hop is a 2 day hop, so you have plenty of time to get through all of the blogs. If you've arrived here from Emily's blog you're on the right track! If you're stopping by my blog today and want to start at the beginning, please visit Emily's blog (link http://www.createserendipity.net/


    On a recent trip to an LSS, I came across this pretty floral patterned paper by one of my all-time favorite lines:  Doodlebug!  Now, I know this paper seems more suited for the spring season, but it was just calling my name! LOL! I actually walked away from it and then went back.  I just couldn't walk out of the store without at least a sheet or two of this paper.  So, of course, I just had to use it for my Hello Kitty project. 


    I had to go with the pink and purple combo.  I think it's such a girly color combination.  I cut HK out of the Cricut HK Greetings cart at 3 inches.  I used some pink and purple cardstock and embossed both to add texture.  I wanted to bling things up, so I added some pink crystal flowers that I've had in my stash for a loooong time!  I also added some round bling from SU! to some of the flower centers.  The final touch was some pretty pink ribbon.


    (close-up of the crystal flowers and bling)


    For this weekend's blog hop, I'm giving away a CUTE set of Hello Kitty cookie cutters! 


     In order to be eligible to win my blog candy, you must :


    1)  Leave a comment on either Saturday or Sunday.  Be sure to include your email address so I can contact you.
    2)  Become a follower of my blog


    I will choose and a post a winner no later than next Wednesday.  

    Don't forget that PSA Essentials is also giving away the grand prize blog candy for this hop.  To be eligible, you must leave a comment on each blog in the blog hop.   


    Next, please hop on over to Lisa's blog to see what she's created!  Thanks for stopping by!


    Lineup:
    Emily: http://www.createserendipity.net/
    Dena : http://missdjones.blogspot.com/
    Lisa : http://handmadewithlove-lisa.blogspot.com/
    Jessica-Creative : http://thecreativestamperspot.blogspot.com/
    Crafty Homemade : http://craftyhomemade.blogspot.com/
    Tammy : http://thepurplemuse.blogspot.com/
    Jearise : http://lorbysworld.blogspot.com/
    Ashley : http://theglamoroussideofscrapping.blogspot.com/
    Lisa: http://prettypaperprettyribbons.blogspot.com/
    Jenny: http://www.crazyaboutcricut.blogspot.com/
    Bryan (SCRAPGUY) http://www.scrapguy.blogspot.com/
    Lynne - http://slasewcraftiness.blogspot.com/
    Anita http://www.anitaandbugs.blogspot.com/
    Theresa ~ www.thescrapbookingqueen.com
    Candace - http://scrappin2littleprincesses.blogspot.com/
    Libby: http://psastampcamp.blogspot.com/